Two weeks ago I drove over to the Welsh borders to visit Donna Chaney, who as most of you know has been keeping all my sculptures’ molds for ceramics production. And making china horses out of them for me. Donna lives on this drop-dead gorgeous farm up on a hill with panoramic views of the valley below from all her studio windows. I forgot to take photos of the day because it was kind of rushed. I have promised to go back and demonstrate some china painting techniques for her and her staff, so I will be sure to take photos when I go next, probably in late August.
Annnnd, (drumroll please…) Here are my ceramics molds, now in the garage of our house here in Maidenhead:
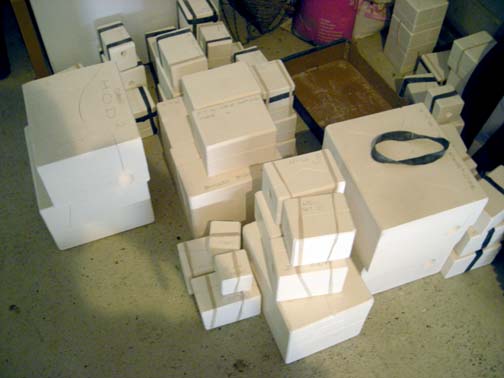
Those of you who know me well, know that this is a pretty big-deal moment. I’ve been agonizing for several years now about those molds and how to get them home to the USA. Now, I know they will go home in the shipping crate with our personal goods in 2011—paid for by Paul’s company! !
Our one-car garage is too narrow for our car to fit in—you can’t open the doors!—and we use it for a storage space instead. Perfect for all this plaster! This isn’t even ALL the molds. At Donna’s we were busy pouring molds and talking and then realized we were running out of time so we had to quickly load the car up. When I got home and unloaded and really looked at what I had, I realized that all the Boreas molds aren’t there—the largest and most massive sets! And I have two good complete sets of those. Plus the Halfling Boreas and the Boreas head molds got left, too.
The Caprice horse sculpture has 9 separate molds. That set is the group closest to the camera in the center of the photo. (The 2 big molds to the right after the group of smaller ones are Streetwise molds.) There are separate little square multi-part plaster molds for the head, each ear, all 4 legs, the main body, and the tail. Some molds have just 2 parts and some have several. Caprice’s body has 4 mold pieces you pull away from the cast greenware part. When I get around to buying my first bucket of slip and next pour a horse, I’ll show you one mold in “exploded” view.
It takes about 2 1/2 hours one way to drive to Donna’s. I arrived about 10:30 am and I had to leave by about 2pm. So I got a whirlwind lesson in making and pouring earthenware slip in one of my mold sets. We chose to use the Caprice set, because it is almost played out (the mold now has a lot of pinhole air bubbles which show up as little pimples in the cast and have to be smoothed out). That is a perfect one to practice on because I won’t be wasting good casts and wearing down a good mold (while I screw up)! Donna’s mold maker and caster, Mark, also was kind enough to make me a “damp box” in a big flat storage bin I brought. A damp box is simply a box with a couple inches of mold plaster poured in the bottom. You use this for storage of your greenware parts and the water-infused plaster will keep them from drying out.
Here are all 9 pieces of an earthenware Caprice, in the damp box:

They’ve been sitting in there for 2 weeks. I’ve been too chicken to take the plunge and start to stick the pieces together. Especially because when I took the main body out of its mold, I gripped it a tiny bit too tightly and dented it!! (I forgot it would be delicate being that large and hollow.) Fortunately I was able to re-shape it right away, but how the heck am I going to hold onto it AND stick everything on, YIKES!
Well today I decided it was time to take the bull by the horns and try to assemble the beast. I set up my little work station on the coffee table in the living room, so that I could also watch the Wimbledon tennis matches on the telly (tee hee). It is a little too close to inquisitive dog-nose level but OK for now. I have to organize my work space out in the dining room eventually.
And Alert The Media: Karen Can Assemble Greenware! !
Here is my little work area (plus KitKat providing encouragement) and ONE LEG ON:

I know many of you follow the work of our USA ceramic horse makers like Joan Berkwitz and Lesli Kathman and Lynn Fraley, so you are familiar with how for the most part (until recently anyway) their goal has been to cast horses that come out of one mold as a complete horse. Which is an amazing thing, truly. My horses were all cast in the UK tradition of bone china where they just reduce the sculpture down to pieces and mold each piece separately, knowing that the casting craftsperson will just have to stick all the pieces together. This process does give the sculptor far more liberty to sculpt as they will. Because if you’re trying to have a horse come out all in one piece, that means you generally can’t have turned heads or anything tricky like manes and tails going every which way. If you think about it, you’ll notice that many china horses are just moving straight, for the same reason. Not so with this method, you can just about sculpt anything and it comes down to how many pieces one is willing to stick together! (And up till now I was paying someone else to do all this work, so I could sculpt with abandon, ha ha. Well the mudhen has come home to ROOST, Karen!)
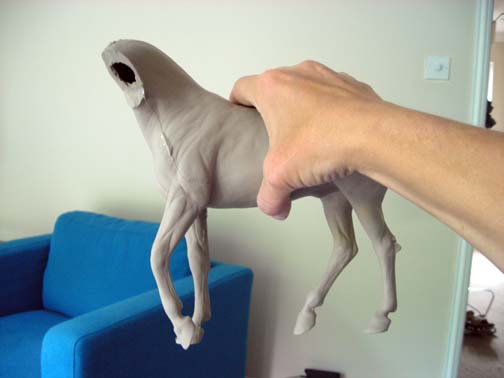
But I digress. To stick all these pieces together, I have to first open up the leg holes in the main body so that the hollow parts of each leg will open into the body:

I am relieved to discover that the main body has firmed up a lot since the day I pulled it from the mold when it was so soft. It is still malleable but stiff enough to hold without too much worry about collapsing! Now I paint some slip “glue” onto a limb (it’s the same earthenware clay we cast with, just made into a more paste-like consistency), and stick that piece onto the horse.
I realize that this is a real testament to the high skill of the mold-maker (in this case it was Mark Farmer) because these pieces match up almost perfectly!! The slip-glue fills in the gaps and because greenware at this stage is still damp it is flexible, and it is SO easy to manipulate and sculpt. I used the same tools I like to use while sculpting, paintbrushes and a few flat sculpting tools, to smooth and sculpt the area around the join. There will be a lot of work later, when the horse is assembled, in smoothing out all the mold lines and resculpting in details lost in handling or where the pieces come together.
Here is Caprice with 4 legs on:
I am amazed at how accurately the legs went on. It just took a little repositioning to get them straight and true to the original sculpture. Woo hoo!
At this point I get a little bold and decide to rush head-first into my first Clay Body Customizing! (That is the name our pioneer in all this, Joanie Berkwitz, coined: any cast ceramic that has been altered from the original casting out of the molds.) I straightened out Caprice’s left ear!!
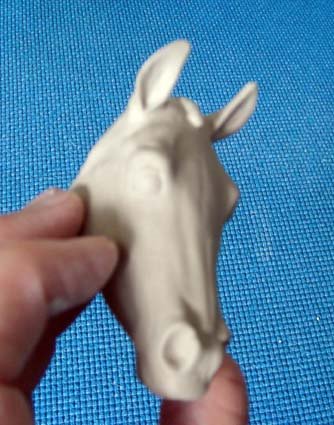
My camera decided to focus on the couch rather than the horse head, but you get the idea. Normally that left ear is turned sideways and down. Wheee!
Finally, here is the Caprice all assembled, except for the tail:

I decided to stop here and take a BIG breather. Because now I am determined to resculpt the tail and attach it differently. I need to carefully think through how I want do that. Then I still have to clean up the whole piece and remove all the mold lines etc. But to get to this place only took about 45 minutes, I am amazed. And it is FUN! Very appealing to the sculptor in me because working with the cast parts feels so familiar to sculpting technique.
Unless I make a clumsy mistake before I finish it (like, trip over a dog with it in my hands — a classic and typical Karen Moment) so far I feel confident that even this one will be worth firing to bisque! And that would be totally totally sweet, because Caprice was my first sculpture ever to be produced in ceramic… it would be so fitting that the first one I create in ceramic with my own two hands should be a Caprice. Especially as the molds are so nearly at the end of their life.
